 Pin it
 My daughter came home from school one Tuesday asking if we could make something that looked like a bunny, and I watched her face light up when I suggested turning fruit into little furry friends. There's something magical about watching kids discover that food can be art, that a strawberry and a marshmallow can suddenly become a creature worth getting excited about. These bunny fruit cups became our Easter tradition almost by accident, turning a simple snack into an afternoon of creative mess and genuine laughter. Now whenever spring rolls around, she's already planning which colors of fruit we'll use and how silly we can make the faces.
I remember pulling these out for a spring potluck at my neighbor's house, and the first thing that happened was every parent asking for the recipe while every child asked if they could take theirs home. One little boy refused to eat his bunny for a solid five minutes because he'd named it and felt like he was being betrayed, which somehow made the whole thing even more worth doing. That's when I realized these aren't really snacks—they're edible conversation starters that bring people together in the kind of silly, wholehearted way that makes memories stick around.
Ingredients
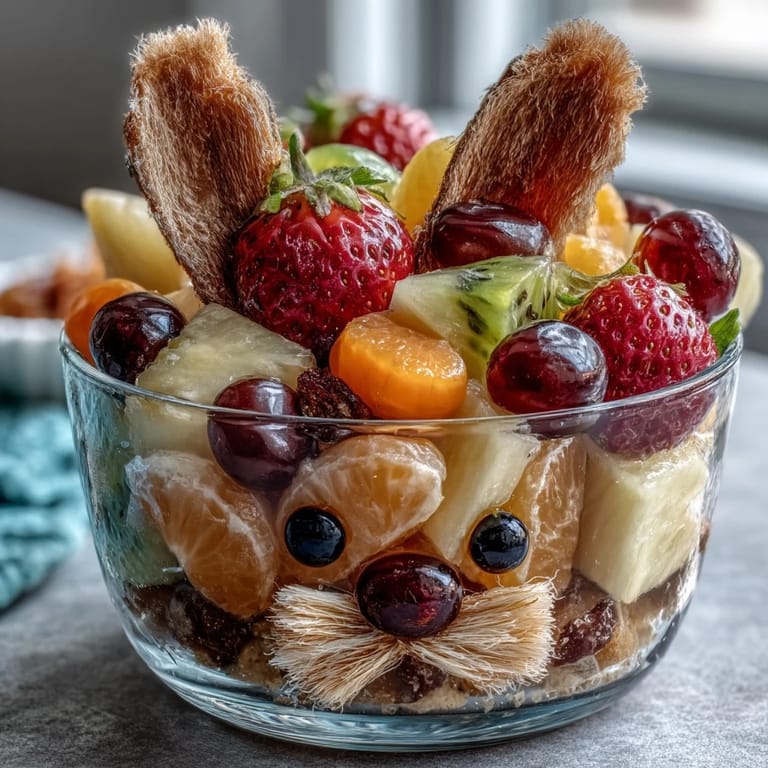
- Strawberries: These give the fruit mix bright color and natural sweetness, plus their soft texture makes them easy for little hands to eat.
- Green grapes: Halving them prevents rolling chaos and adds a crisp, juicy element that balances the softer fruits.
- Blueberries: These small gems add pops of color and won't overwhelm tiny mouths—plus they roll around in the bottom, creating little delightful surprises.
- Pineapple: Diced small, this brings tropical brightness and a mild tartness that keeps the cups from feeling too sweet.
- Large marshmallows: These serve as the bunny's cheeks and are your main sculpting element, so pick ones that feel sturdy enough to hold up the decorations.
- Mini marshmallows: Perfect for noses, they're small enough to tuck between the larger marshmallows without overwhelming the face.
- Candy eyes: These are the quickest way to give your bunnies personality—I've found that bigger eyes look more expressive, but use what delights your crowd.
- Pink jellybeans or chocolate candies: These create adorable noses and add a little edible detail that makes the whole face feel intentional.
- White paper cupcake liners: Folded and cut, these become surprisingly convincing bunny ears that stand tall without flopping over.
- Black edible marker: This is your detail tool—use it to draw whiskers, a mouth, or even eyebrows to give each bunny genuine personality.
- Banana and kiwi: Optional, but they add extra color variety and work beautifully if you're feeding kids with specific fruit preferences.
Tired of Takeout? 🥡
Get 10 meals you can make faster than delivery arrives. Seriously.
One email. No spam. Unsubscribe anytime.
Instructions
- Wash and prep your fruit:
- Rinse everything under cool water and pat dry—wet fruit won't hold decorations as well, and the grapes especially benefit from being completely dry. Set your prepared fruits in a large mixing bowl where you can see all those beautiful colors together.
- Mix the fruit base:
- Gently combine all your diced strawberries, halved grapes, blueberries, and pineapple chunks in that bowl, stirring just enough to blend the colors without crushing anything. If you're using banana or kiwi, wait to add those until right before serving so they don't brown or lose their brightness.
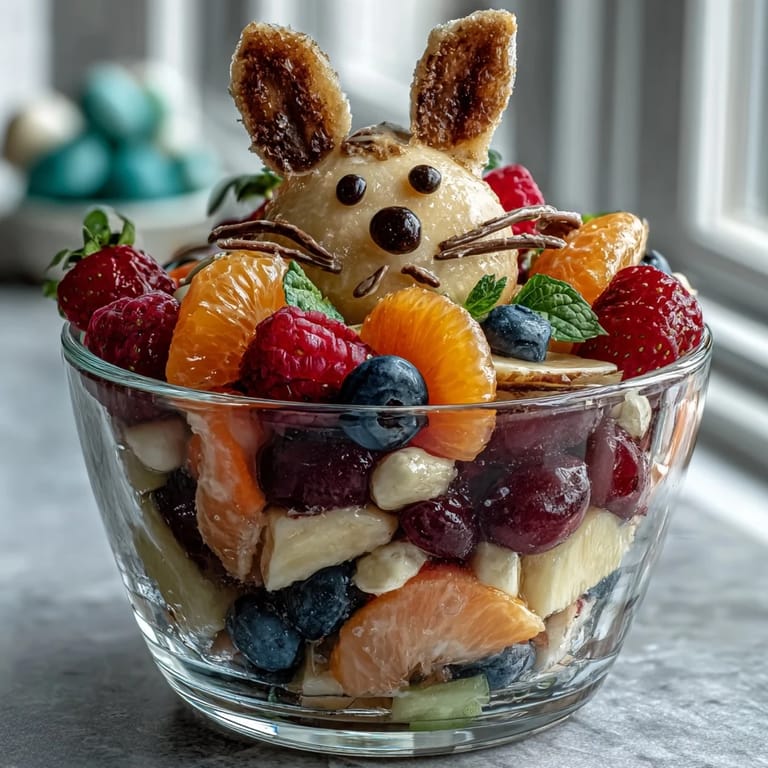
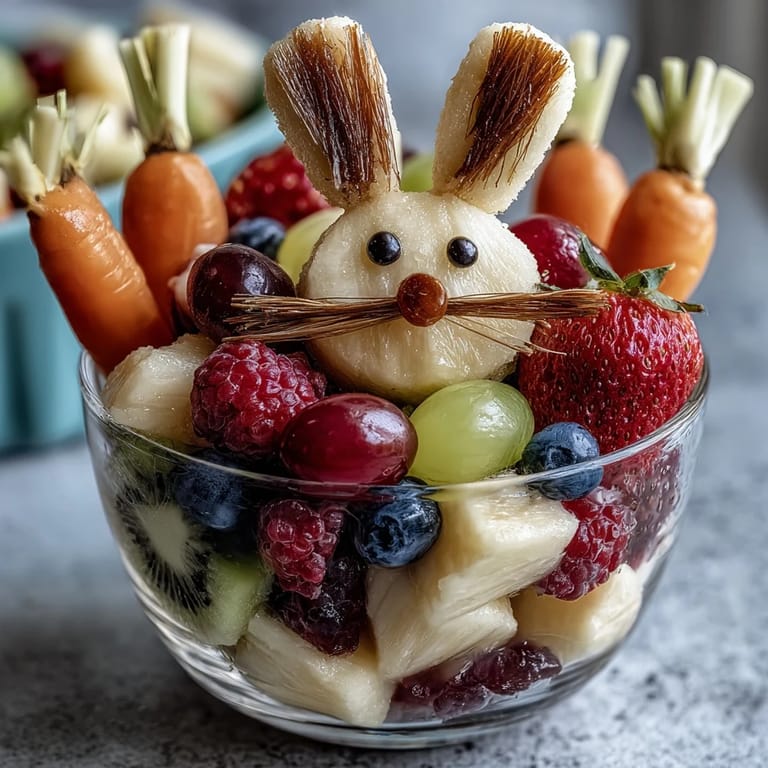
- Divide fruit into cups:
- Use a spoon to evenly distribute the fruit mixture among your six clear cups, filling each about two-thirds full. The clear cups are essential here because half the charm is seeing those colorful fruits layered below the bunny face you're about to create.
- Attach the cheeks:
- Press two large marshmallows onto the front of each cup, positioning them side by side like chubby little cheeks. They'll stick slightly to the cup on their own, but if one refuses to cooperate, a tiny dab of honey on the bottom works like edible glue.
- Add the nose:
- Place a mini marshmallow or pink jellybean right between those marshmallow cheeks, nestling it in so it looks like a proper bunny snout. This is where the face really comes alive—I always step back and squint a little to see if the proportions feel right.
- Attach the eyes:
- Using a toothpick or the back of a small spoon, create tiny indents in the large marshmallows where eyes should go, then press your candy eyes into place. A microscopic dab of honey helps them stay put, though marshmallows are naturally sticky enough that most eyes stay without extra help.
- Draw the whiskers and mouth:
- With your black edible marker, sketch delicate whiskers radiating out from the center marshmallow and a small smile or mouth beneath the nose. This step is where your bunny truly becomes an individual character—some get mischievous grins, some get surprised expressions, and some get adorably buck-toothed smiles.
- Create and attach the ears:
- Take your white paper cupcake liners and fold each one in half, then carefully cut them into ear shapes using scissors. Tape or glue two ears to the back inside rim of each cup so they stand up tall and visible—I prefer tape because it stays put longer than glue.
- Chill and serve:
- You can serve these immediately, or pop them in the refrigerator for up to four hours, which actually firms up the marshmallows and makes them slightly less sticky to handle. Either way, present them with pride because you've just turned fruit into art.
 Pin it
 There's a moment during every gathering where someone's kid comes up to me and seriously asks if they can take their bunny home instead of eating it, and I've learned that's actually the highest compliment this recipe can receive. That tension between seeing it as food and seeing it as a little edible friend is exactly what makes it memorable, and honestly, I'm fine with kids sitting with their fruit cups for an extra five minutes just to admire the faces before they dive in.
Customizing Your Bunnies
The beauty of this recipe is that it invites creative chaos—you can swap fruits based on what's in season or what your kids actually enjoy eating. I've made versions with mango, raspberries, watermelon, and even diced apples, and each one looked completely different while still feeling like a bunny. The key is keeping a good mix of colors so the cups look vibrant and inviting, rather than being heavy on one fruit that might overwhelm the sweetness balance.
Dietary Swaps and Allergen Solutions
For dairy-free or vegan versions, the marshmallows are your main culprit since they typically contain gelatin, but vegan marshmallow brands work beautifully and create the same effect. You can also skip the marshmallows entirely and use sliced banana pieces for cheeks, or even white chocolate chunks if you want something firmer that still provides that pale contrast to the colorful fruit. Always double-check candy labels for gluten and dairy, especially if you're serving kids with allergies, because some brands are sneaky about what they hide in their ingredients.
Pro Tips and Final Thoughts
The secret to bunny faces that actually hold together is assembly timing—do this no more than two hours before serving, because marshmallows begin weeping moisture if they sit too long in the refrigerator. I've learned the hard way that using a dab of honey instead of traditional icing glue makes everything taste better and keeps the sweetness from becoming overwhelming. One last thing: trust your instincts on the decorative details, because there's no wrong way to draw a bunny face once you've got those marshmallow cheeks in place.
- Keep your edible marker capped until the last possible moment so the tip doesn't dry out, and test it on a scrap of marshmallow first to make sure it's actually working.
- If you're making these for a larger group, assembly-line style works beautifully—set up all your components in a row and work through each step for all six cups together rather than completing one at a time.
- These bunnies make genuinely wonderful gifts if you package them carefully in a shallow box with the ears standing up, creating a moment of pure joy when someone opens it and finds a whole family of fruit-filled bunnies waiting inside.
 Pin it
 These bunny fruit cups remind me why cooking for kids matters so much—it's not just about nutrition, it's about creating moments where food becomes a reason to smile, create, and sit together. Every time I make them, I'm still amazed at how simple ingredients can transform into something that sparks genuine joy in a way fancy restaurant food never quite does.
Recipe FAQs
- → What fruits work best for colorful cups?
Use a mix like strawberries, green grapes, blueberries, pineapple, bananas, and kiwi for bright, varied colors and flavors.
- → How do I make the bunny ears stand up?
Fold paper cupcake liners, cut into ear shapes, and tape or glue two ears to the inside rim of each cup for a sturdy, upright effect.
- → Can this snack be made dairy-free?
Yes, replace marshmallows with vegan alternatives or skip them entirely to keep the cups dairy-free.
- → How long can the fruit cups be stored before serving?
Refrigerate the prepared fruit cups up to 4 hours ahead. Assemble decorations shortly before serving for best appearance.
- → What tools are needed for preparation?
A knife, cutting board, mixing bowl, small clear cups, edible marker, scissors, and tape will help create the fruit cups and decorations.