 Pin it
 The winter I first attempted this pie, my tiny apartment kitchen smelled like pure chocolate indulgence for days. I'd never made anything with quite so many layers before, and watching my grandmother's face light up when she took that first bite made every messy step worthwhile. She declared it better than the version she'd had at some fancy restaurant in Memphis years ago, which I still consider the highest compliment of my cooking life.
My friend Sarah requests this for her birthday every single year now. Last summer we made it together on her back porch, taking turns whisking the pudding while her kids kept trying to sneak chocolate shavings off the counter. We ended up eating it straight from the pan with spoons, laughing about how there was no point in pretending we'd wait for proper slices.
Ingredients
- Unsalted butter: Room temperature butter incorporates more easily into the brownie batter for that dense fudgy texture we want
- Granulated sugar: This creates the crackly top on the brownie layer while sweetening perfectly without being cloying
- Large eggs: Room temperature eggs emulsify better with the butter and sugar, creating that smooth, uniform batter
- Vanilla extract: Pure vanilla enhances the chocolate flavors rather than competing with them
- All-purpose flour: Just enough flour to hold the brownie together while keeping it intensely fudgy
- Unsweetened cocoa powder: Dutch processed cocoa gives the deepest, richest chocolate flavor throughout every layer
- Salt: A pinch of salt makes all the chocolate flavors pop and balances the sweetness
- Whole milk: Full fat milk creates the silkiest, most luxurious pudding layer imaginable
- Egg yolks: These act as a natural thickener and add incredible richness to the pudding
- Bittersweet chocolate: Chopped into small pieces so it melts seamlessly into the warm pudding
- Heavy whipping cream: Cold cream whips up faster and holds its shape better for that beautiful topping
- Powdered sugar: Dissolves instantly into the whipped cream without any grainy texture
Tired of Takeout? 🥡
Get 10 meals you can make faster than delivery arrives. Seriously.
One email. No spam. Unsubscribe anytime.
Instructions
- Prep your oven and pan:
- Set your oven to 180°C (350°F) and generously butter a 23 cm (9-inch) pie dish or springform pan, getting into all the corners so nothing sticks.
- Make the fudgy brownie base:
- Melt your butter in a large mixing bowl, then whisk in the sugar until combined. Add the eggs and vanilla, whisking until everything is smooth and glossy. Sift in the flour, cocoa powder, and salt, then fold until just combined—don't overmix or you'll lose that fudgy texture.
- Bake until perfectly fudgy:
- Spread the batter evenly in your prepared pan and bake for 20–22 minutes. A toothpick inserted into the center should come out with moist crumbs, not clean. Let it cool completely before adding the next layer.
- Start the chocolate pudding:
- In a medium saucepan, whisk together the sugar, cocoa powder, cornstarch, and salt until no lumps remain. Gradually whisk in the whole milk, making sure to get into the corners of the pan so everything is incorporated.
- Cook until thickened:
- Set the saucepan over medium heat and stir constantly with a heat-proof spatula. The mixture will suddenly thicken and start to bubble after 5–7 minutes—don't walk away or it might scorch on the bottom.
- Temper the egg yolks:
- While the pudding heats, beat your egg yolks in a small bowl. Whisk a few spoonfuls of the hot pudding into the yolks to warm them gradually, then pour everything back into the saucepan.
- Finish the pudding:
- Cook for another 2–3 minutes, stirring constantly, then remove from heat. Stir in the chopped chocolate and vanilla until smooth and glossy. Let it cool for 10–15 minutes, stirring occasionally to prevent a skin from forming.
- Assemble and chill:
- Pour the pudding over your completely cooled brownie base. Press plastic wrap directly onto the surface of the pudding and refrigerate for at least 1 hour to set properly.
- Whip the cream:
- In a cold bowl (I pop mine in the freezer for a few minutes), beat the heavy cream, powdered sugar, and vanilla until soft peaks form—when you lift the beaters, the cream should hold its shape but still look smooth.
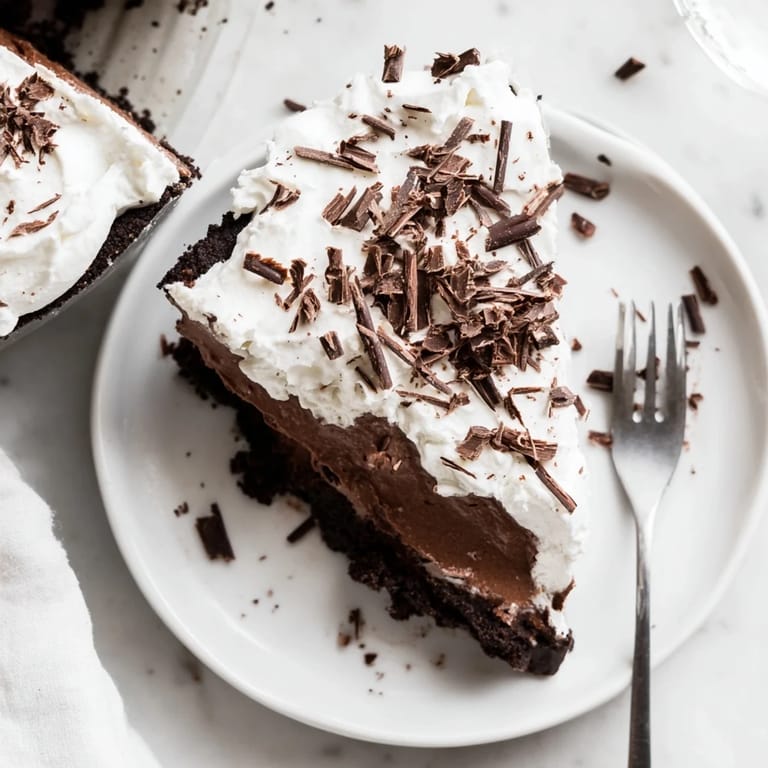
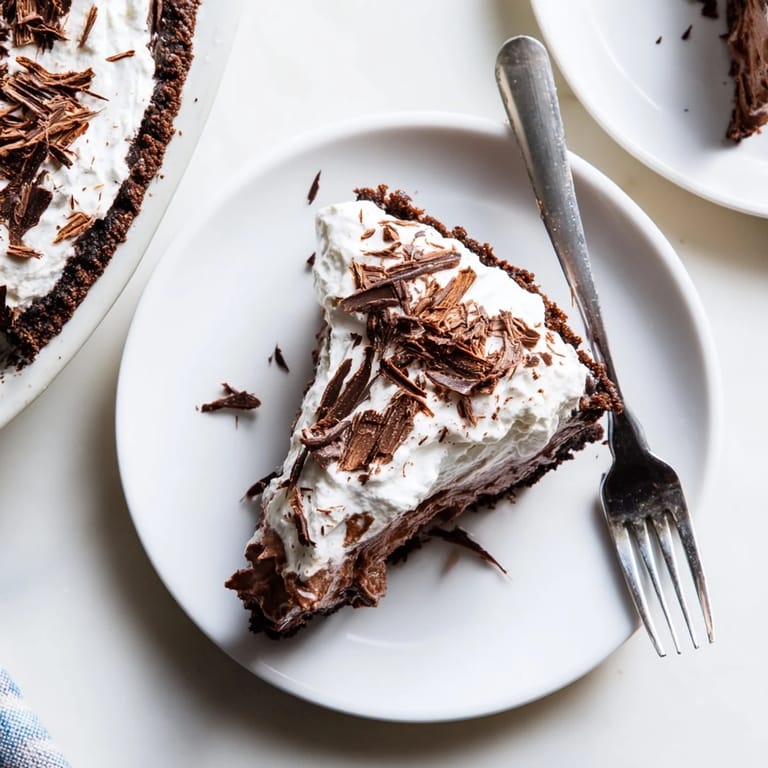
- Finish with flair:
- Spread the whipped cream over the chilled pudding layer, making decorative swoops with your spatula. Garnish with chocolate shavings or a light dusting of cocoa powder, then chill for another 30 minutes before serving.
 Pin it
 This pie became my go to contribution for every family gathering after my uncle asked for the recipe three times in one evening. There's something about the combination of textures that makes people close their eyes and savor every bite, forgetting whatever else is happening around them.
Making It Ahead
The entire pie can be assembled up to 24 hours in advance, though I recommend adding the whipped cream topping no more than 4 hours before serving to keep it from weeping. The brownie base actually improves after a day in the refrigerator, becoming even more dense and fudgy.
Serving Suggestions
Let the pie sit at room temperature for about 10 minutes before slicing—this makes cutting cleaner and lets the flavors open up beautifully. A sharp knife dipped in hot water and wiped between slices creates the most presentable pieces.
Creative Variations
Sprinkle chopped pecans or walnuts over the brownie layer before adding the pudding for a delightful crunch that cuts through all the richness. Some coffee lovers add a tablespoon of instant espresso powder to the pudding for a mocha variation that's absolutely sophisticated.
- Try adding a layer of salted caramel between the brownie and pudding for sweet salty contrast
- Swirl melted peanut butter into the pudding before it sets for a chocolate peanut butter version
- Top with crushed Oreos instead of whipped cream for an cookies and cream twist
 Pin it
 This Mississippi Mud Pie has become the dessert I turn to when I want to make someone feel truly special. There's pure joy in watching people discover each layer for the first time.
Recipe FAQs
- → Why is it called Mississippi Mud Pie?
The name derives from its resemblance to the muddy banks of the Mississippi River, with dark chocolate layers representing the rich, dark soil. This Southern classic became popular in the 1970s and has since become a beloved dessert across America.
- → Can I make Mississippi Mud Pie ahead of time?
Absolutely. In fact, it's recommended to prepare it at least 4 hours before serving to allow proper chilling. The components can be made up to 2 days in advance—store the brownie and pudding layers separately, then assemble and top with whipped cream shortly before serving.
- → Why does my pudding sometimes turn lumpy?
Lumps typically form when cornstarch isn't fully dissolved before cooking, or when the mixture heats too quickly. Whisk the dry ingredients thoroughly with cold milk before turning on the heat. Once cooking, maintain constant stirring and medium heat to ensure smooth, even thickening.
- → What's the best way to slice this pie cleanly?
Use a sharp knife dipped in hot water and wiped clean between cuts. For even cleaner slices, freeze the pie for 30 minutes before serving—this firms up the layers without compromising texture. Run the knife under hot water, dry it, and slice with one smooth motion.
- → Can I use a different type of chocolate?
Yes, but keep in mind that different chocolates yield different results. Semi-sweet chocolate creates a milder flavor, while milk chocolate makes the dessert sweeter. For the most authentic experience, stick with bittersweet or dark chocolate (60-70% cocoa) in the pudding layer.
- → How do I know when the brownie base is done?
The brownie should be set around the edges but slightly soft in the center. A toothpick inserted should come out with moist crumbs, not wet batter. Remember, it will continue cooking slightly from residual heat and will firm up as it cools—overbaking leads to a dry, crumbly base.